

As winter finally fades and the first warm days of the season arrive, homeowners naturally shift their focus to outdoor projects, deep cleaning, and shaking off the winter chill. However, there is one critical area of your home that often gets overlooked until it is too late: your heating, ventilation, and air conditioning system.
Skipping seasonal upkeep can turn a minor issue into a major breakdown on the hottest day of the year. Investing time in comprehensive Spring HVAC Maintenance is the single best way to ensure your home stays cool, your energy bills stay manageable, and your cooling system lives a long, healthy life.
This comprehensive guide breaks down exactly why springtime service matters, provides a step-by-step DIY checklist, details what the pros look for during a precision tune-up, and shares expert strategies to maximize your system’s efficiency all summer long.
Why Spring HVAC Maintenance is Non-Negotiable
Your air conditioning system has likely spent the last four to six months sitting completely idle, collecting dust, cobwebs, and outdoor debris. On the flip side, if you use a heat pump system, it has been working overtime through the freezing winter months to keep your family warm.
Transitioning directly from winter workloads or long periods of dormancy into the intense heat of summer without a proper inspection is a recipe for system failure.
1. Slashing Energy Costs
An unmaintained air conditioner can easily consume up to 30% more energy to produce the exact same amount of cooling as a clean, finely tuned system. When dust blankets your indoor evaporator coil or leaves clog the outdoor condenser, the system has to run significantly longer cycles to lower your indoor temperature. Longer run times directly translate to higher utility bills.
2. Preventing Catastrophic Summer Breakdowns
The law of home maintenance dictates that your air conditioner will never break down on a mild, breezy 75°F Tuesday. It will break down on a scorching, humid 95°F Sunday afternoon when emergency technician rates are at their peak. Comprehensive maintenance catches worn components—like failing capacitors, frayed fan belts, or minor refrigerant leaks—before they cascade into major system failures that leave you stranded in a sweltering house.
3. Preserving Equipment Lifespan
An HVAC system is one of the most expensive investments you will ever make in your home. While the average central AC unit is designed to last 12 to 15 years, skipping annual care can easily slash that lifespan down to 8 to 10 years. The constant strain of operating through restricted airflow and dirty components accelerates wear and tear on the compressor—the expensive “heart” of your system.
4. Protecting Your Manufacturer Warranty
Many homeowners do not realize that the fine print of their equipment warranty explicitly requires regular, professional maintenance. If your compressor fails five years into a ten-year warranty, the manufacturer may require proof of annual service before they ship out a replacement part. Lacking regular service records could result in a denied claim, leaving you with a bill for thousands of dollars.
The Ultimate Step-by-Step Spring HVAC Maintenance Checklist
To make this process as straightforward as possible, we have broken down your seasonal preparation into distinct, actionable phases. You can easily tackle several of these tasks on a free Saturday morning, while others are best left to the licensed experts at Family Heating, Cooling, Electric & Plumbing.
Phase 1: Indoor DIY Tasks
Before you ever flip your thermostat from “Heat” to “Cool,” start inside your home with these essential preparation steps.
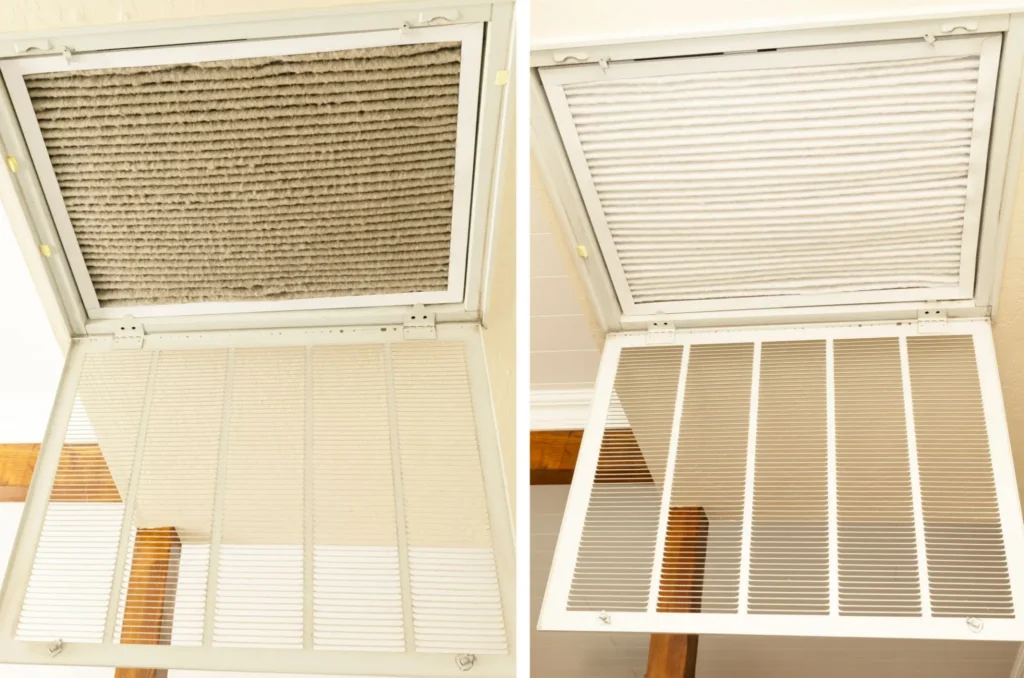
Step 1: Change the Air Filter
This is the absolute baseline of all Spring HVAC Maintenance, yet it is the one homeowners forget most often. A clogged, dust-caked air filter chokes your system’s airflow. This forces the blower motor to work harder, overheats the system, and can even cause your indoor evaporator coil to freeze solid into a block of ice.
- Inspection Frequency: Check your filter every 30 days.
- Replacement Strategy: Replace standard 1-inch pleated filters at least every 90 days. If you have pets, allergies, or smoking in the home, drop that window down to every 40 to 60 days.
- Pro-Tip: Write the date of installation directly on the cardboard frame of the new filter so you never have to guess how long it has been in service.
Step 2: Uncover and Clean Supply and Return Vents
Walk through every room in your house and inspect your air vents. Over the winter, furniture may have been rearranged, rugs shifted, or heavy curtains hung in ways that inadvertently block your HVAC registers.
- Ensure there is at least a 10-inch clearance zone around all return air grilles and supply vents.
- Use the brush attachment on your vacuum cleaner to clear away accumulated dust, pet hair, and lint from the vent louvers.
- Warning: Never close off more than 10% of your home’s registers to “save energy” in unused rooms. Closing vents builds up excessive static pressure within your ductwork, which can damage your blower motor and cause systemic airflow imbalances.
Step 3: Audit and Clean Around the Indoor Air Handler
Whether your indoor unit is located in a dedicated utility closet, a basement, or up in an attic, the space surrounding it must remain clear.
- Clear away holiday decorations, storage boxes, cleaning supplies, and chemicals from the immediate vicinity of the unit.
- Maintaining a clear 3-foot perimeter around your air handler ensures proper airflow, reduces fire hazards, and gives technicians immediate, safe access if an emergency repair is needed.
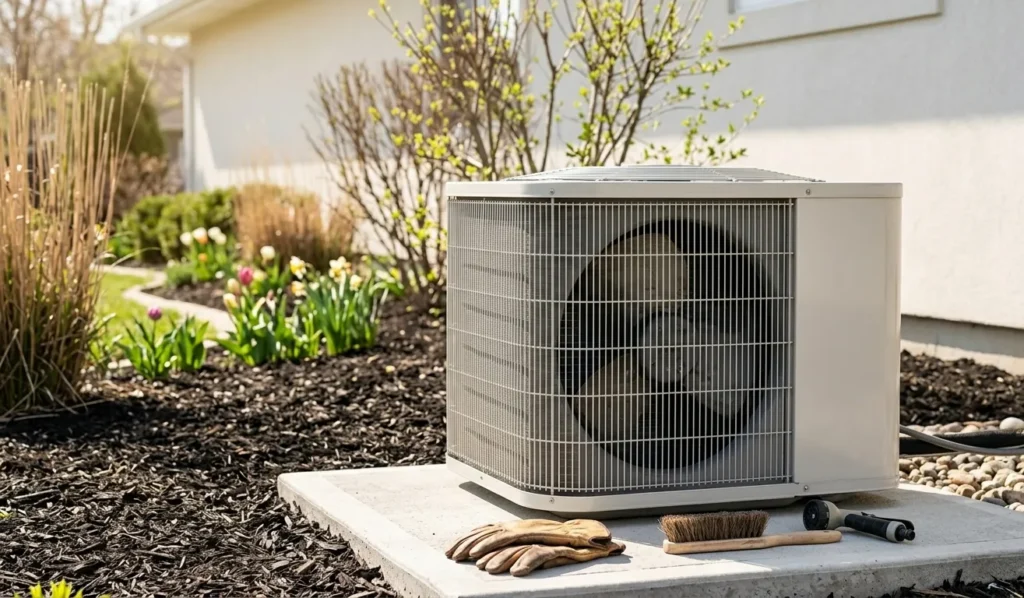
Phase 2: Outdoor DIY Tasks
Your outdoor condenser unit bears the brunt of the elements all year long. Winter storms, falling branches, dead leaves, and spring pollen can quickly choke its ability to shed heat.
Step 1: Establish a Clear Buffer Zone
Vegetation grows rapidly once spring hits. Vines, bushes, and tall weeds can wrap around or crowd your condenser unit, suffocating its airflow.
- Cut back bushes, shrubs, and ornamental grasses so there is a minimum of 2 feet of clear, open space on all sides of the outdoor unit.
- Look upward and trim back any low-hanging tree branches within 5 feet of the top of the unit to prevent falling leaves and twigs from dropping straight into the top fan.
Step 2: Clear Away Ground Debris
Wind-blown debris often accumulates right at the base of your AC unit over the winter months.
- Manually pull away packed leaves, mulch, twigs, and grass clippings from around the base of the concrete or plastic condenser pad.
- Ensure that dirt or landscaping mulch hasn’t accumulated to the point where it covers the bottom edge of the metal unit frame.
Step 3: Inspect the Outdoor Condenser Exterior
Take a close look at the exterior of the unit without opening any electrical panels.
- Check the Fins: The aluminum cooling fins surrounding the unit should be straight and evenly spaced. If you notice large areas of bent or flattened fins (often caused by hail, stray soccer balls, or pressure washers), your unit’s heat transfer efficiency will drop.
- Inspect the Insulation: Look at the thick copper line running from the outdoor unit into your home. This is the suction line, and it should be covered in thick, intact black foam pipe insulation. If the insulation has dry-rotted, cracked, or been stripped away by birds nesting over winter, replace it to prevent energy loss and condensation issues.
Phase 3: Thermostat Testing

Your thermostat is the command center of your entire comfort system. Testing it early in the spring ensures it is accurately communicating with your equipment.
Step 1: Perform a System Test Run
Do not wait for the first intense hot day of summer to find out if your air conditioning works. Run a test cycle on a mild spring afternoon.
1.Switch Modes:Set to Cool.
Turn your thermostat interface completely off for 60 seconds, then toggle the system mode from “Heat” or “Off” directly over to “Cool.”
2.Adjust the Temperature:Set lower than ambient.
Drop the target temperature setting down to at least 3 to 4 degrees lower than the current indoor temperature shown on the display.
3.Listen and Feel:Monitor the startup.
Listen closely for the indoor blower fan to kick on. Step outside to confirm that the outdoor condenser fan is spinning and that you can hear the steady hum of the compressor engaging.
4.Verify Cold Air:Check vents after 10 mins.
Let the system run continuously for roughly 10 to 15 minutes. Place your hand over a nearby supply register; the air blowing out should feel distinctly crisp and cold.
Step 2: Fresh Batteries
If your thermostat relies on standalone batteries rather than a dedicated common wire (C-wire) or system to your electrical services page, since modern smart thermostats often require professional electrical wiring. Fading batteries can cause erratic system behavior, failure to follow programs, or a completely blank screen right when you need cooling the most.
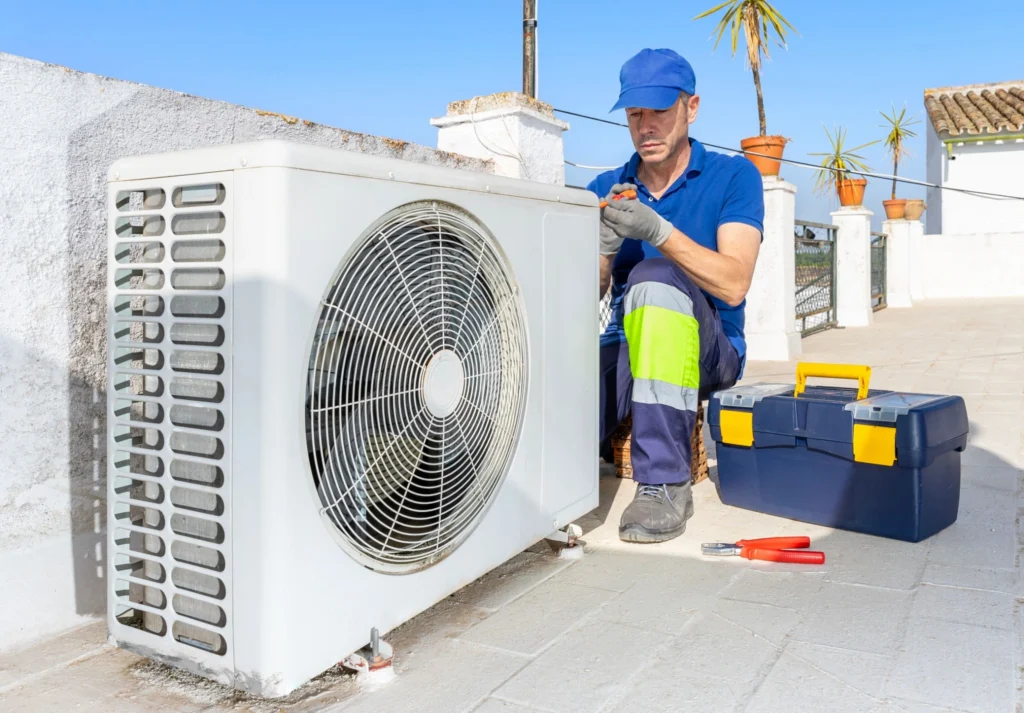
When to Call the Pros: The Professional Maintenance Checklist
While DIY tasks keep your system clean on the surface, a modern air conditioner is a highly complex combination of high-voltage electrics, volatile chemical refrigerants, and delicate digital controls. Attempting to service these internal components yourself can void warranties, damage the equipment, or pose serious personal safety risks.
A licensed technician from Family Heating, Cooling, Electric & Plumbing brings specialized diagnostic tools to execute a comprehensive technical inspection.
| Maintenance Task | DIY Component | Professional Component |
| Airflow Management | Check & replace 1″ to 4″ air filters; clean supply/return grilles. | Inspect ductwork for static pressure drops; measure total CFM output; test blower motor capacitor. |
| Coil & Condenser Care | Trim brush 2 feet around unit; clear leaves from condenser pad. | Chemical flush of outdoor condenser coil; deep clean indoor evaporator coil; clear condensate trap. |
| Electrical System | Inspect visible outdoor conduit for obvious physical damage. | Tighten all terminal connections; measure voltage drop; check contactors for pitting/burn marks. |
| Refrigerant System | Visually check foam insulation wrap on the copper line set. | Hook up digital manifolds to measure subcooling, superheat, and exact refrigerant charge pressure. |
What a Professional Precision Tune-Up Delivers
When you schedule professional Spring HVAC Maintenance with our team, our certified technicians systematically execute a deep checklist designed to optimize performance.
Deep Chemical Coil Cleaning
Even if you change filters diligently, microscopic dust particles slip through and blanket your indoor evaporator coil over time. Outside, your condenser coil becomes choked with fine pollen, dirt, and outdoor grime. We use specialized, self-rinsing chemical coil cleansers to lift stubborn buildup out from deep between the aluminum fins, instantly restoring optimal heat transfer.
Clearing the Condensate Drain Line
As your air conditioner cools your home, it simultaneously pulls gallons of moisture out of your indoor air. This water collects in a drain pan beneath your evaporator coil and flows out through a PVC condensate line. Over time, algae, mold, and bacteria can form a thick slime inside this pipe, creating a stubborn clog.
Our professional technicians flush the drain line with specialized clearing agents or blast it clean using compressed air, ensuring you avoid catastrophic water overflows that can ruin drywall and flooring.
Comprehensive Electrical Diagnostics
Your system relies on heavy-duty capacitors to start up its motors. These capacitors gradually lose their ability to hold a charge over time. A tech uses a multimeter to measure the exact microfarads of your capacitors. Catching a weak capacitor in spring prevents it from failing during a peak summer heatwave, saving your compressor motor from overheating and burning out.
Verifying Perfect Refrigerant Charge
An air conditioner does not “consume” refrigerant; it circulates a fixed charge through a sealed loop. If your system is low on refrigerant, it means there is a leak somewhere in the copper lines or coils.
Our pros monitor subcooling and superheat levels to ensure the charge matches factory specifications. Running a system even slightly low on refrigerant starves the compressor of vital cooling, driving up power bills and risking early equipment failure.
Pro-Tips to Boost Efficiency Beyond the Checklist
Once your system has been cleaned and checked, you can leverage several smart home habits to lower your cooling costs even further through the hot summer months.
The 20-Degree Rule: Air conditioning systems are fundamentally designed to lower your indoor air temperature by a maximum of 15°F to 20°F compared to the outdoor air. Setting your thermostat to 65°F when it is 100°F outside will not make the air coming out of your vents any colder—it simply forces your system to run non-stop for hours on end, causing unnecessary strain.
- Deploy Smart Thermostat Schedules: Program your thermostat to let indoor temperatures rise by 4 to 5 degrees when the house is completely empty during the workday. Bringing the temperature back down gradually when you return consumes less total energy than trying to maintain a chilly temperature inside an empty home all day long.
- Harness the Power of Ceiling Fans: Ceiling fans create a wind-chill effect on your skin, making a room feel roughly 4 degrees cooler than it actually is. This allows you to raise your thermostat setting without sacrificing comfort. Just remember: fans cool people, not rooms. Turn them off when you leave the space to save electricity.
- Manage Your Solar Heat Gain: Windows facing south and west let in an incredible amount of radiant heat during peak afternoon hours. Close your blinds, drapes, or solar shades during the hottest parts of the day to block this heat from entering your home, dramatically reducing the workload on your air conditioner.
Spring Maintenance FAQs
You should have your system professionally serviced twice per year: once in the spring for your air conditioning or heat pump cooling system, and once in the early autumn for your furnace or heating components. Regular bi-annual maintenance keeps your entire system running safely and efficiently year-round.
No, never use a pressure washer on an HVAC unit. The high-pressure stream from a pressure washer will instantly bend, flatten, or crush the delicate aluminum fins on your condenser unit. This severely restricts airflow and ruins heat transfer. Always stick to a standard garden hose equipped with a gentle spray nozzle.
This common issue is typically caused by a few specific culprits: a severely clogged air filter completely blocking system airflow, a failed outdoor start capacitor preventing the compressor from turning on, or a low refrigerant charge caused by a system leak. Start by replacing your air filter; if that doesn’t fix the issue within an hour, turn the system off and contact Family Heating, Cooling, Electric & Plumbing to diagnose the electrical and refrigerant levels.
A comprehensive, high-quality professional maintenance visit typically takes anywhere from 60 to 90 minutes per system. Beware of companies advertising quick “15-minute checkups,” as it is physically impossible to properly clean coils, clear drain lines, check electrical connections, and verify refrigerant pressures in that short of a window.
Act Early for Summer Peace of Mind
The best time to take care of your Spring HVAC Maintenance is early in the season, well before the intense summer heat sets in. Booking your professional service appointment early in the spring allows you to secure a convenient time slot before HVAC companies get overwhelmed with emergency service calls later in the season.
By combining consistent DIY habits—like regular filter changes and keeping your outdoor unit clear—with a thorough professional inspection to your contact or appointment scheduling page to drive direct conversions from Family Heating, Cooling, Electric & Plumbing, you can protect your investment, lower your monthly energy costs, and enjoy a cool, worry-free summer.